Model Actions
All available model actions in 3D AI Studio. Retopology, format conversion, rigging, texturing, segmentation, 3D printing, and more.
After you generate a 3D model (or upload one), you can process it further using Model Actions. Open your model from the Dashboard and click the process button to see all available options.
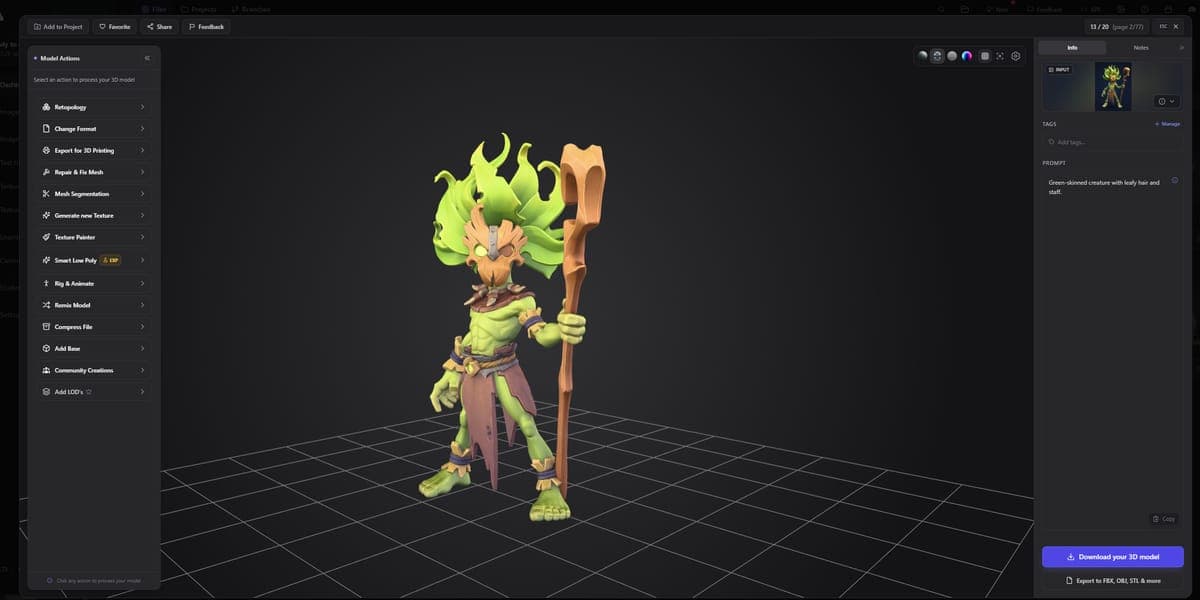
Available Actions
| Action | What it does | Credits | More info |
|---|---|---|---|
| Retopology | Rebuild mesh with clean topology, reduce poly count, convert formats | 0-15 | Remesh Tool |
| Change Format | Convert between GLB, FBX, OBJ, STL, USDZ, 3MF, PLY | 1 | Format Conversion |
| Export for 3D Printing | Watertight STL or multi-color 3MF at real-world size | Free to prepare, download on paid plans | Export for 3D Printing |
| Repair & Fix Mesh | Fix holes, normals, and non-manifold geometry | 2-4 | Mesh Repair |
| Mesh Segmentation | AI splits model into logical parts (limbs, clothing, etc.) | 10-15 | Segmentation |
| Generate new Texture | AI retexturing with PBR materials from text or image | 20-30 | Texture Generator |
| Texture Painter | Paint directly on the 3D model in the browser | Free | Texture Painter |
| Smart Low Poly | AI retopology to a clean, lightweight mesh; optional UV unwrap in the same step | 15-35 | Smart Low Poly |
| UV Unfold | Clean UV layout; Smart UV keeps textures, rig and animation | 5-15 | UV Unfold |
| Rig & Animate | Add a skeleton and animations to character models | 15-20 | Rigging & Animation |
| Remix Model | Generate AI variations of the same model | 4-8 | Dashboard only |
| Compress File | Draco compression and texture optimization | Free | GLB Compression |
| Add Base | Add a pedestal or platform under your model | Free | Add Base |
| Community Creations | Submit your model to the public community library | Free | Dashboard only |
| Add LOD's | Generate Level of Detail variants at different poly counts | 1 per LOD | Dashboard only |
Image Actions
When you generate or upload an image, a different set of actions is available:
| Action | What it does | Credits |
|---|---|---|
| Use in Image to 3D | Send the image to Image to 3D to generate a 3D model | Free (generation costs apply separately) |
| Open in Image Studio | Open the image in Image Studio for further editing | Free |
| Edit Image with AI | AI-powered editing via prompt (change style, objects, background) | 4-8 |
| Upscale Image | AI 2x upscale with optional face enhancement | 2 |
| Remove Background | Remove the background from the image | 2 |
| Change Format & Resize | Convert between JPG, PNG, WebP with quality settings | Free |
| Delight Image | Remove harsh shadows and normalize lighting (great prep for 3D conversion) | 2 |
| Community Creations | Submit the image to the public community library | Free |
How to Access
- Open your model from the Dashboard
- Click the process/actions button
- Choose the action you want
- Configure settings if needed
- Results are saved to your model page
Most actions require a paid plan. Free tools (Export for 3D Printing, Texture Painter, Compress File, Add Base, Community Creations) run client-side or cost zero credits but still need an active subscription for downloads.
Frequently Asked Questions
3D AI Studio gives you over a dozen processing options right from your Dashboard. You can convert formats, reduce poly count with retopology, add a skeleton and animations, generate new textures, segment the mesh into parts, repair geometry issues, compress the file, and more. Just open your model and click the process button to see every available action.
It depends on the action. Several tools in 3D AI Studio are free, including Export for 3D Printing, Texture Painter, GLB Compression, and Add Base. Other actions range from 1 credit (format conversion) up to 30-35 credits for more intensive AI processing like texture generation or smart low poly. The credits column in the actions table above shows the exact cost for each.
You can use model actions on any model in your 3D AI Studio library, whether it was generated with Image to 3D, Text to 3D, or uploaded from your own files. Upload your model through the Dashboard, and all the same processing tools become available.
Start with Format Conversion to export as FBX, which is the preferred format for both Unity and Unreal Engine. If the poly count is too high, run the Retopology action first to bring it down. 3D AI Studio also has dedicated integration guides for Unity and Unreal Engine with engine-specific tips.
UV Unfold
AI-powered automatic UV unwrapping for 3D models. Generate clean UV layouts with three engines, including Smart UV, which keeps your textures, rigging and animation.
Format Conversion
Change any model in your 3D AI Studio library to GLB, GLTF, FBX, OBJ, STL, USDZ, 3MF or PLY in seconds. Costs 1 credit and keeps the original file.