Flow Overview
Updated June 2026
Flow is the visual node editor inside 3D AI Studio. Instead of running one tool at a time, you place each step as a “node” on an infinite canvas, draw wires between the nodes to pass data from one step to the next, and then run the whole pipeline with a single click.
Think of it as the difference between cooking one dish at a time versus setting up a kitchen line. Once your line is set up, you can run the same recipe again and again, change one ingredient, and get a fresh result without rebuilding anything.
Flow is part of 3D AI Studio, the all in one platform for turning text and images into 3D models. If you are new here, the standalone Image to 3D generator is the quickest way to see what the models can do before you start chaining them together in Flow.
Flow is currently in a private beta. The first time you open it you may see a “Join the beta” screen. Click the button to opt in and you will be taken straight into the editor. You can leave the beta anytime in Settings.
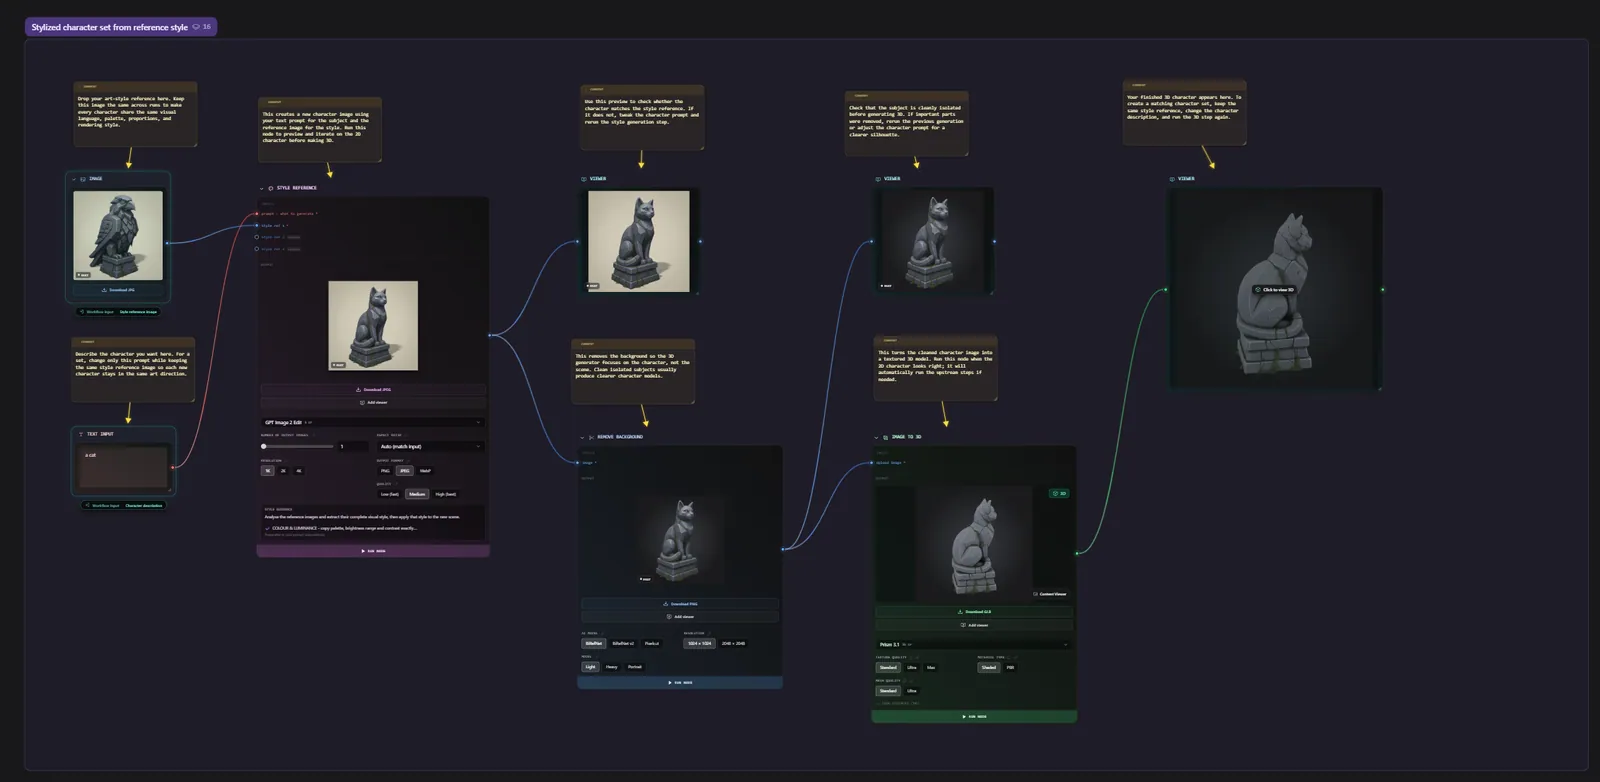
A complete Flow pipeline on the canvas. Each card is a step, and the wires carry data from one step to the next.
Who Flow is for
Flow works for two very different kinds of people, and it is built to serve both at once.
- Beginners can start from a ready made template, change a prompt or an image, and press Run. You never have to understand the wiring to get a result.
- Power users can build complex multi stage pipelines: generate a reference image, make four turnaround views, convert those into a 3D model, retexture it, and export it, all on one canvas that you can rerun forever.
If you have ever used a node editor like Blender’s shader nodes, Unreal’s Blueprints, or ComfyUI, you will feel at home immediately. If you have not, do not worry. The rest of this guide explains every piece from the ground up.
What you can do with Flow
Flow connects almost every generation tool in 3D AI Studio into one canvas. In a single pipeline you can:
- Write text prompts and combine them.
- Generate images from text.
- Edit images with AI using plain language instructions.
- Use moodboards and style references to keep a consistent look.
- Turn one image into four orthographic views (front, left, right, back).
- Convert images into full 3D models.
- Generate 3D models directly from text.
- Retexture, retopologize (remesh), and convert the format of 3D models.
- Compare results side by side and view them full screen.
- Run an entire pipeline, queue several runs, and collect every output.
You can also ask the built in AI assistant, named Bob, to build or edit the whole pipeline for you in plain English.
The core ideas (read this first)
Flow has a small number of concepts. Once these click, everything else makes sense.
Nodes
A node is a single step in your pipeline, drawn as a card on the canvas. Each node does one job: a “Generate Image” node turns a prompt into an image, an “Image to 3D” node turns an image into a model, a “Prompt” node holds text, and so on. Nodes are covered in full in the Nodes Reference.
Handles and wires
Every node has small dots on its edges called handles. Handles on the left are inputs (data coming in), handles on the right are outputs (data going out). You connect an output handle to an input handle by dragging a wire between them.
Wires are color coded by the kind of data they carry, so you can read a pipeline at a glance:
| Color | Data type | Example |
|---|---|---|
| Red | Text | A prompt |
| Blue | Image | A single picture |
| Indigo | Image set | A group of images (a moodboard) |
| Green | Mesh | A 3D model |
| Amber | Number | A seed or a setting value |
| Violet | LLM | Text from a language model |
| Cyan | Viewer | A preview passthrough |
You can only connect handles of the same type. A blue image output will not connect to a red text input, which prevents you from building broken pipelines by accident.
Running
When you press Run, Flow works out the correct order to execute your nodes (everything a node depends on runs before that node), then runs them one at a time and feeds each result into the next step. Running is covered in full in Running Flows.
Flows, templates, and runs
- A flow (also called a canvas) is your editable document, the pipeline you are building.
- A template is a saved snapshot of a flow that you or someone else can reuse.
- A run is one execution of a flow with a specific set of inputs.
Templates and sharing are covered in Templates & Sharing.
A simple first pipeline
Here is what a basic “text to 3D, with control” pipeline looks like in words:
- A Prompt node holds the text “a cute wooden robot toy”.
- A wire carries that text into a Generate Image node, which produces a picture.
- A wire carries that image into an Image to 3D node, which produces a model.
- You press Run, and the three steps execute in order: prompt, then image, then model.
The advantage over running the tools separately is that you can now change the prompt to “a cute metal robot toy”, press Run again, and the whole chain regenerates. Nothing has to be re wired. The 3D step gives you the same quality as the standalone Image to 3D tool, just inside a repeatable pipeline.
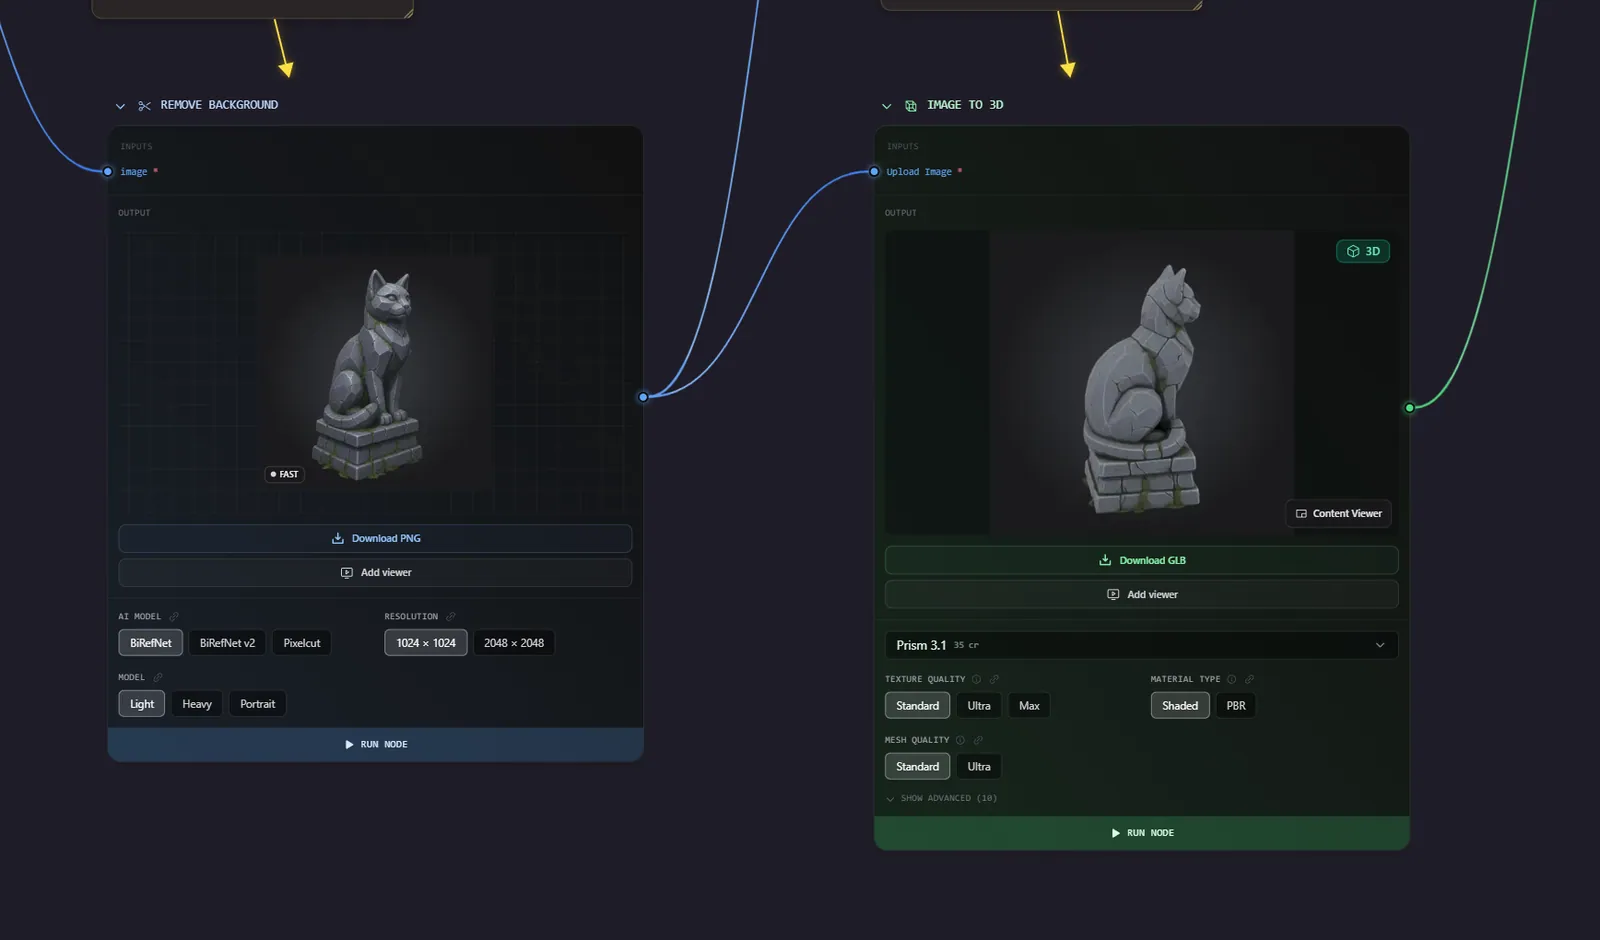
A slightly longer pipeline: an image has its background removed, then the clean result is converted into a 3D model.
Why build the image first instead of going straight from text to 3D? Because you get to see and perfect the picture before spending credits on a 3D model. Images are cheaper than models, so you can iterate freely on the look, then convert only once you are happy.
How this guide is organized
This documentation walks through the whole tool from start to finish. Read it in order for a complete understanding, or jump to the section you need.
- The Flows Dashboard - the home screen where you see your flows, create new ones, and browse templates.
- The Canvas Editor - the editor layout, toolbar, panels, navigation, and keyboard shortcuts.
- Nodes Reference - how handles and connections work, plus every node explained.
- Running Flows - running single nodes and full pipelines, the run panel, the queue, and turning a flow into a reusable app.
- AI Assistant (Bob) - building and editing pipelines in plain English.
- Templates & Sharing - saving, sharing, publishing, and version history.
- Models, Credits & Downloads - the model catalog, parameters, credit costs, and downloading results.
Frequently Asked Questions
What is Flow in 3D AI Studio?
Flow is a visual node editor where you build AI pipelines by connecting nodes on a canvas. Each node is one step (a prompt, an image generation, a 3D conversion, and so on), and wires pass data between them. You build the pipeline once and can rerun it with different inputs as many times as you like.
Do I need to know node editors to use Flow?
No. You can start from a template, change the prompt or image, and press Run without ever touching the wiring. Node editing is there when you want more control, but it is optional. Beginners can get results in minutes.
How is Flow different from using the tools separately?
The normal tools run one operation at a time. Flow lets you chain many operations into one repeatable pipeline. Change one input and rerun the whole chain. It is ideal when you do the same multi step process repeatedly or want consistent, reproducible results.
Does Flow cost anything to use?
Building and wiring pipelines costs nothing. You spend credits only when you run nodes that call AI models, exactly like the standalone tools.
Is Flow similar to ComfyUI?
Conceptually yes. Both are node based pipeline builders for AI generation. Flow is built into 3D AI Studio, runs entirely in your browser with no setup, focuses on the image and 3D generation tools in the platform, and includes an AI assistant that can build pipelines for you in plain English.