Image to 3D
Turn a photo, sketch or drawing into a textured 3D model with Image to 3D. Pick a model, compare costs and settings, and download it in 1-10 minutes.
Image to 3D turns a photo, sketch or illustration into a textured 3D model. Upload the image, pick an AI model and download the result as GLB, FBX, OBJ, STL or USDZ, usually within 1-10 minutes depending on the model.
| Input | One PNG, JPG or WebP image, or several views of the same object |
| Cost | 15-75 credits depending on the model, 35 for the default Prism 3.1 |
| Time | 60 seconds to 12 minutes, 3-5 minutes for Prism 3.1 |
| Output | Textured mesh with optional PBR maps |
| Downloads | GLB, FBX, OBJ, STL, USDZ |
How do I turn a picture into a 3D model?
Open Image to 3D, upload the picture, choose a model such as Prism 3.1 and click Generate. The AI reconstructs the full shape, including the sides it cannot see, and textures it with the colors from your image.
- Open Image to 3D from the sidebar or use the photo to 3D model converter on 3daistudio.com
- Add your image by dragging it onto the upload area, clicking to browse, or pasting it with Ctrl+V (Cmd+V on Mac)
- Check the preview thumbnail to confirm the image looks right
- Choose an AI model (see the comparison below)
- Optionally adjust texture quality, mesh quality, PBR materials or face limit
- Click Generate, then inspect and download the model in the 3D viewer
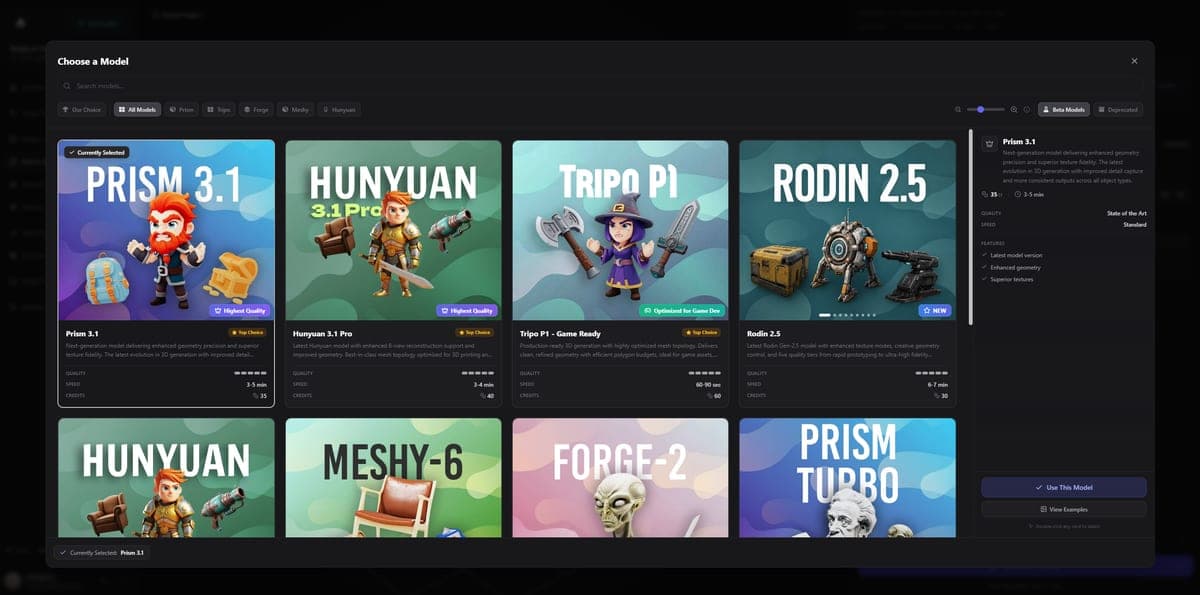
Which AI model should I choose?
Start with Prism 3.1: it is the default and the best balance of quality, speed and cost. Switch models only for a specific need such as game-ready topology, speed or a lower price.
| If you want... | Use | Why |
|---|---|---|
| The best all-round result | Prism 3.1 | Default, state-of-the-art quality for 35 credits |
| The fastest result | Tripo P1 Game Ready | Finishes in 60-90 seconds |
| Game assets | Tripo P2 Game Ready | Optimized topology and optional quad meshes |
| Maximum detail | Hunyuan 3.1 Pro | State-of-the-art detail and textures |
| The lowest price | Trellis 2 | Starts at 15 credits |
| The newest texturing (experimental) | Prism 3.1 with Texture Model set to Latest | New texturing pass with a Fast tier and Neutral Lighting |
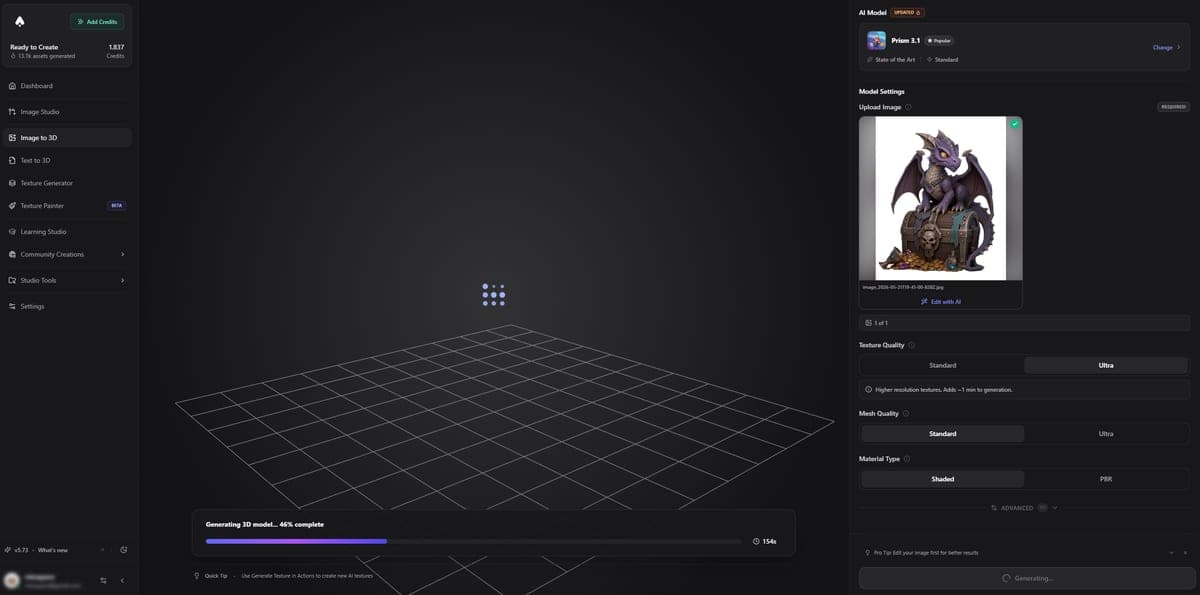
How do the single-image models compare?
All single-image models build the complete 3D shape from one photo. They differ in price, speed and detail.
| Model | Credits | Speed | Quality | Time |
|---|---|---|---|---|
| Prism 3.1 (default) | 35 | Standard | State of the art | 3-5 min |
| Hunyuan 3.1 Pro | 40 | Standard | State of the art | 3-4 min |
| Tripo P2 Game Ready | 70 | Fast | State of the art | 1-3 min |
| Tripo P1 Game Ready | 60 | Fast | State of the art | 60-90 sec |
| Meshy 7.1 | 40 | Standard | State of the art | 5-10 min |
| Trellis 2 | 15-41 | Standard | High | 4-8 min |
| Rodin 2.5 | 30 | Fast-Standard | State of the art | 6-7 min |
| Forge Gen-2 | 35 | Standard | State of the art | 5-7 min |
| Hunyuan 3.0 | 40 | Standard | State of the art | 3-4 min |
| Prism 3.0 (legacy) | 30 | Standard | High | 2-4 min |
| Seed3D 1.0 | 30 | Standard | High | 8-12 min |
Seed3D 1.0 is in beta and available on paid plans only. Prism 3.1's Latest texture model costs the same as Standard. Its results can vary while it is being evaluated, so Standard remains the recommended choice for production work.
When should I use a multi-view model?
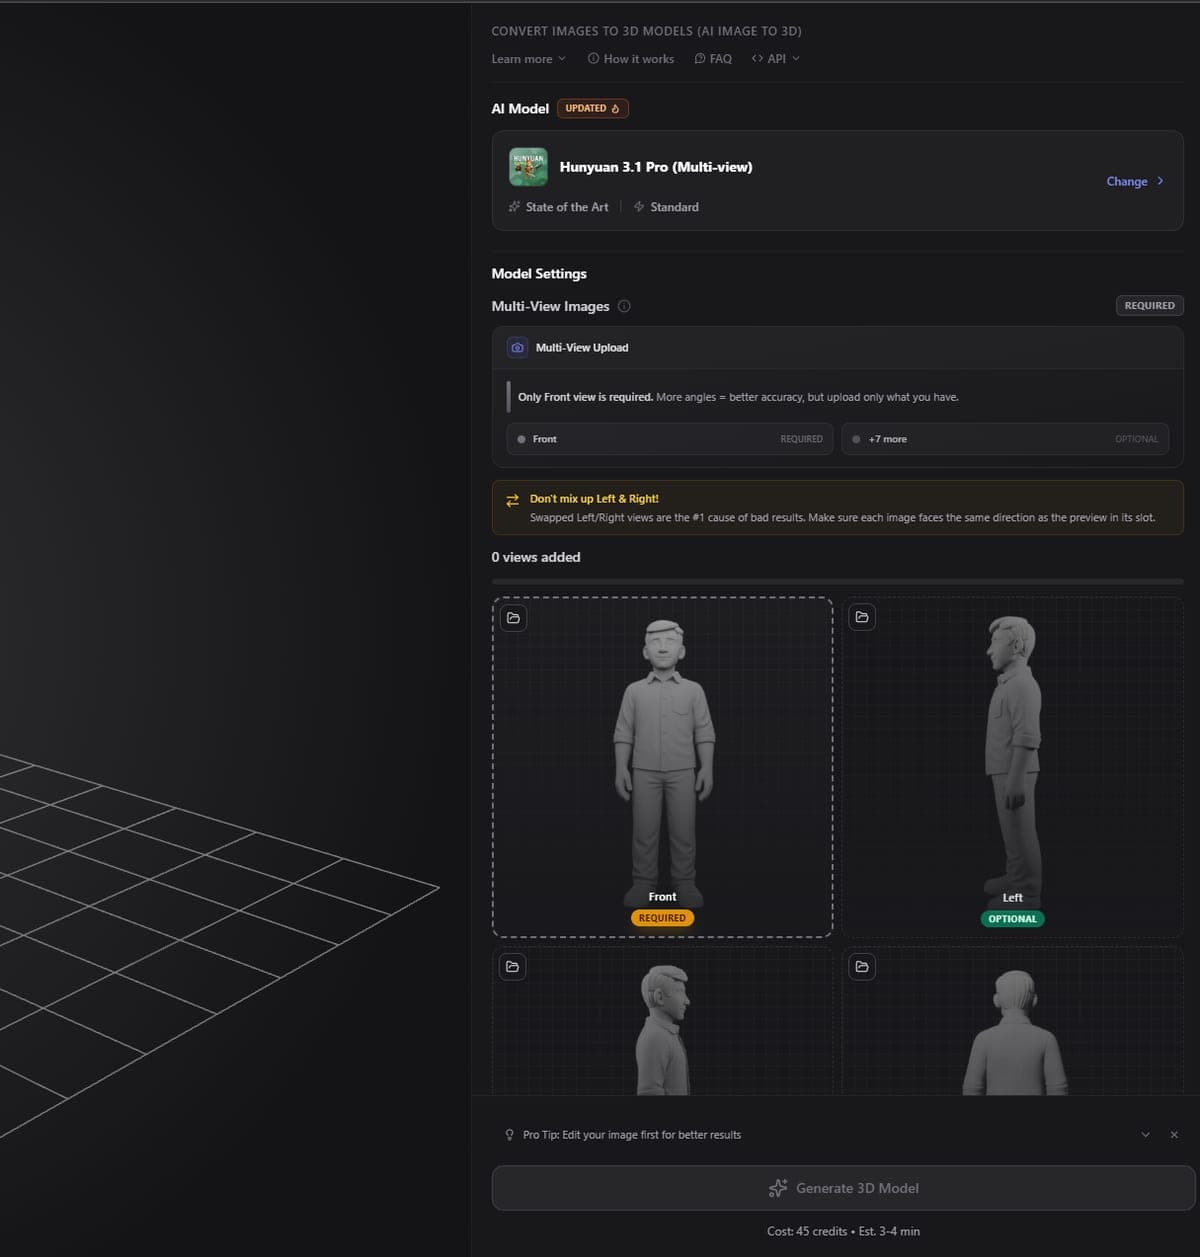
Use a multi-view model when you have photos of the same object from several angles and the hidden sides must be accurate, for example product models or characters whose back matters. Single-image models guess the unseen sides; multi-view models reconstruct them from real views.
There are two input types:
- Fixed views: the model expects specific angles (front, left, back, right) and you assign each image to its slot.
- Flexible multi-image: upload several images from any angles and the model works out how they relate.
Multi-image models are available on paid plans only.
| Model | Credits | Input | Time |
|---|---|---|---|
| Prism 3.1 Multi-view | 40 | 4 fixed views (front, left, back, right) | 3-5 min |
| Hunyuan 3.1 Pro Multi-view | 45 | 1-8 assigned views | 3-4 min |
| Tripo P2 Multi-view | 75 | 4 fixed views | 1-3 min |
| Tripo P1 Multi-view | 65 | 4 fixed views | 60-90 sec |
| Meshy 7.1 Multi-image | 45 | 1-4 images | 5-10 min |
| Rodin 2.5 Multi-image | 35 | 2-5 images | 6-7 min |
| Forge Gen-2 Multi-image | 40 | 2-5 images | 5-7 min |
| Hunyuan 3.0 Multi-view | 45 | 4 views | 3-4 min |
| Prism 3.0 Multi-view (legacy) | 35 | 4 fixed views | 2-4 min |
Keep the same lighting, distance and background in all photos. Inconsistent shots confuse the reconstruction.
What makes a good input image?
A sharp, well-lit image of a single object on a plain background gives the best 3D model. Busy backgrounds, harsh shadows and heavy compression turn into unwanted geometry or noise.
- Plain background: solid white, gray or transparent works best. Remove a cluttered background first with the one-click tool in Image Studio.
- Even lighting: avoid harsh shadows and overexposed areas.
- Sharp, high-resolution image: blur and compression artifacts show up as bumps in the mesh. PNG gives the cleanest result.
- Subject fills the frame: centered and not cropped.
- Slight 3/4 angle: showing the front and one side gives more depth cues than a flat front view.
Phone photos work well when the object is in focus and well lit. If a photo has strong shadows or a color cast, set the Texture Model to Latest (Prism 3.1 or Tripo P2) and turn on Neutral Lighting.
What do the generation settings do?
The settings control texture resolution, polygon density and the extra maps you get. The defaults suit most images, so change them only when you have a specific target.
- Texture quality: resolution of the texture maps. Higher is sharper and takes slightly longer.
- Mesh quality: polygon density. Higher gives smoother surfaces and finer detail.
- Mesh detail (Meshy 7.1): Meshy's Ultra geometry pass. Standard, Ultra 2K (+10 credits) or Ultra 4K (+15 credits, single image only).
- PBR materials: adds normal, roughness and metallic maps to the base color, for realistic rendering in game engines.
- Face limit: the maximum polygon count, useful for specific platforms.
- Seed: the same image, seed and settings reproduce the same result.
- Auto-size: scales the model to realistic real-world dimensions.
- Texture Model (Prism 3.1, Tripo P2): Standard (default) or Latest (experimental), which adds the Fast texture quality and Neutral Lighting at the same price.
- Neutral Lighting: removes shadows, highlights and color casts baked into the photo before texturing. Available with the Latest texture model.
- Quad Mesh Output (Tripo P2): four-sided polygons for rigging and subdivision, delivered as FBX alongside a GLB preview. No extra cost, capped at 25,000 polygons.
Which formats can I download?
Download the finished model as GLB, FBX, OBJ, STL or USDZ directly from the 3D viewer. PBR maps are included as separate image files with OBJ and FBX.
| Format | Use for |
|---|---|
| GLB | Blender, Unity, Unreal, web viewers, general use |
| FBX | Game engines and animation pipelines |
| OBJ | Static meshes, maximum compatibility |
| STL | 3D printing (geometry only) |
| USDZ | AR Quick Look on Apple devices |
More formats and comparisons are in Export Formats.
What's next
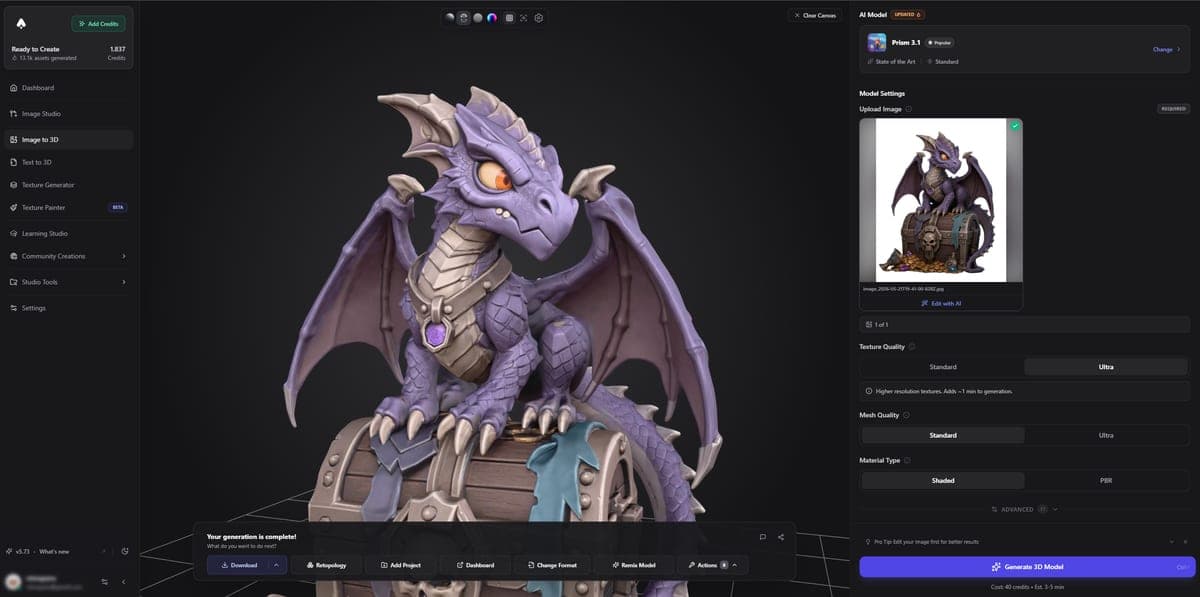
Turn your picture into a 3D model now, with free credits on signup. To start from a description instead of a picture, see the Text to 3D guide. For the cleanest results, follow the recommended workflow: perfect the reference image first, then convert it.
Frequently Asked Questions
New accounts get free credits on signup, enough to test several generations. After that, models cost 15 credits (Trellis 2) up to 75 credits (Tripo P2 Multi-view). There is no free unlimited tier.
Yes. Open the model in Export for 3D Printing, which makes it watertight, sets the height in millimeters and downloads an STL, or a multi-color 3MF for an AMS or MMU. Solid, chunky objects print better than thin, delicate ones. The full walkthrough is in our article on how to 3D print a picture.
Yes. Every model textures the mesh with the colors and details from your image. Enable PBR materials to also get normal, roughness and metallic maps. Texture sharpness depends on the input resolution and the texture quality setting.
Recommended Workflow
The best way to create 3D models is to generate or edit a reference image first, then convert it to 3D. This guide shows you the full workflow with real examples.
Text to 3D
Generate a 3D model from a text prompt: write a short description, pick a model and download a textured mesh. Prompt tips, model comparison and settings.