Export for 3D Printing
Turn any AI 3D model into a watertight, print-ready STL, 3MF or OBJ: one color, 1-8 filaments on an AMS or MMU, or full color, with a live preview.
Export for 3D Printing turns any 3D model into a print-ready file in your browser. It seals the model into a watertight solid, lets you print it in one color, with up to 8 filaments or in full color, and downloads a 3MF that opens in Bambu Studio, OrcaSlicer or PrusaSlicer with the colors already painted in.
| Cost | Preparing and previewing are free, downloading is included in paid plans |
| Runs | On your device, the model is never uploaded |
| Opens from | Any Dashboard model, Change Format, or a GLB/GLTF upload |
| Print setups | Single color (any printer), Multi-color with 1-8 filaments (AMS, MMU, tool changer), Full color (ProJet, PolyJet, Mimaki, HP) |
| Preparation | Automatically watertight and checked edge by edge |
| Downloads | 3MF, STL, OBJ, GLB, plus VRML and PLY for full color |
Export for 3D Printing replaced the earlier vertex color tool on October 1, 2026. The old workflow is still described on the Vertex Color (Legacy) page.
How do I prepare a 3D model for 3D printing?
Open the model, choose Export for 3D Printing, pick single or multi-color, set the height and download. The model is made watertight automatically, so it opens cleanly in your slicer without a separate repair step.
- Open a model from your Dashboard and choose Export for 3D Printing in its actions. To use a file from elsewhere, upload a GLB or GLTF to the standalone tool
- Wait a few seconds while the model is sealed into one watertight solid, verified edge by edge and its colors are read
- Choose Single color, Multi-color or Full color, and switch the preview between Original, Compare and Printed to see how the print will look
- Set the height in millimeters and choose your printer
- Optionally turn on DetailForge for sharper surface detail
- Pick a format and download
The Change Format dialog also links here when you pick a 3D printing format, so you can choose colors and size before downloading.
How do I 3D print in multiple colors?
Choose Multi-color, pick how many filaments you have (1 to 8) and download a 3MF. The model's own colors are turned into clean, printable color regions that still look like the original, and the slicer receives them as filaments 1, 2, 3 and so on.
- Suggested colors: colorful models start with 4 filaments, what most AMS and MMU units hold, and the tool suggests the number of colors that captures your model best
- Color detail: Clean makes big, calm color areas with the fewest filament swaps, Balanced keeps faces and markings readable with few swaps, Fine follows the texture closely with more swaps and purge
- Protect small details: eyes, mouths and markings keep a contrasting filament instead of vanishing, even with just a few colors
- Cleanup: specks and lines too thin for your nozzle are removed, so fewer color changes are wasted
While you adjust, the tool estimates what the colors cost at the printer:
| Estimate | What it tells you |
|---|---|
| Looks like the model | How closely the printed colors match the original, in percent |
| Filament swaps | Roughly how many color changes the print needs |
| Purge | Roughly how much filament the swaps waste, in grams |
| Extra time | Roughly how much longer the color changes make the print |
The estimates assume an AMS or MMU at 0.2 mm layers. A tool changer swaps faster. Multi-color is only available when the model has colors of its own.
How do I match the colors to my filaments?
Save the filaments you own, then let the export use them or match the colors to real filaments in one click. You can still change any color by hand and go back with Reset colors.
- Your filaments: saved in your browser and offered first every time
- Match to filaments: maps each color to the closest of your saved filaments, or to common filament colors if you have not saved any
- Change a color: pick any color for a region by hand
- Hover to find: hovering a color highlights where it is on the model
How do I fix spots in the wrong color?
Use Touch up to paint over areas that ended up in the wrong filament. It works on multi-color exports with two or more colors, and your paint is included in the downloaded file.
Pick the filament to paint with, adjust the brush size and paint directly on the preview. Undo and redo work as usual, and Done returns to the export settings.
How do I print in a single color?
Choose Single color and pick your filament color from the quick colors, your saved filaments or a custom color. The color only changes the preview and the 3MF. STL files carry no color.
On a colorful model, the tool offers to switch to Multi-color if you have an AMS or MMU.
How do I export for full color 3D printing?
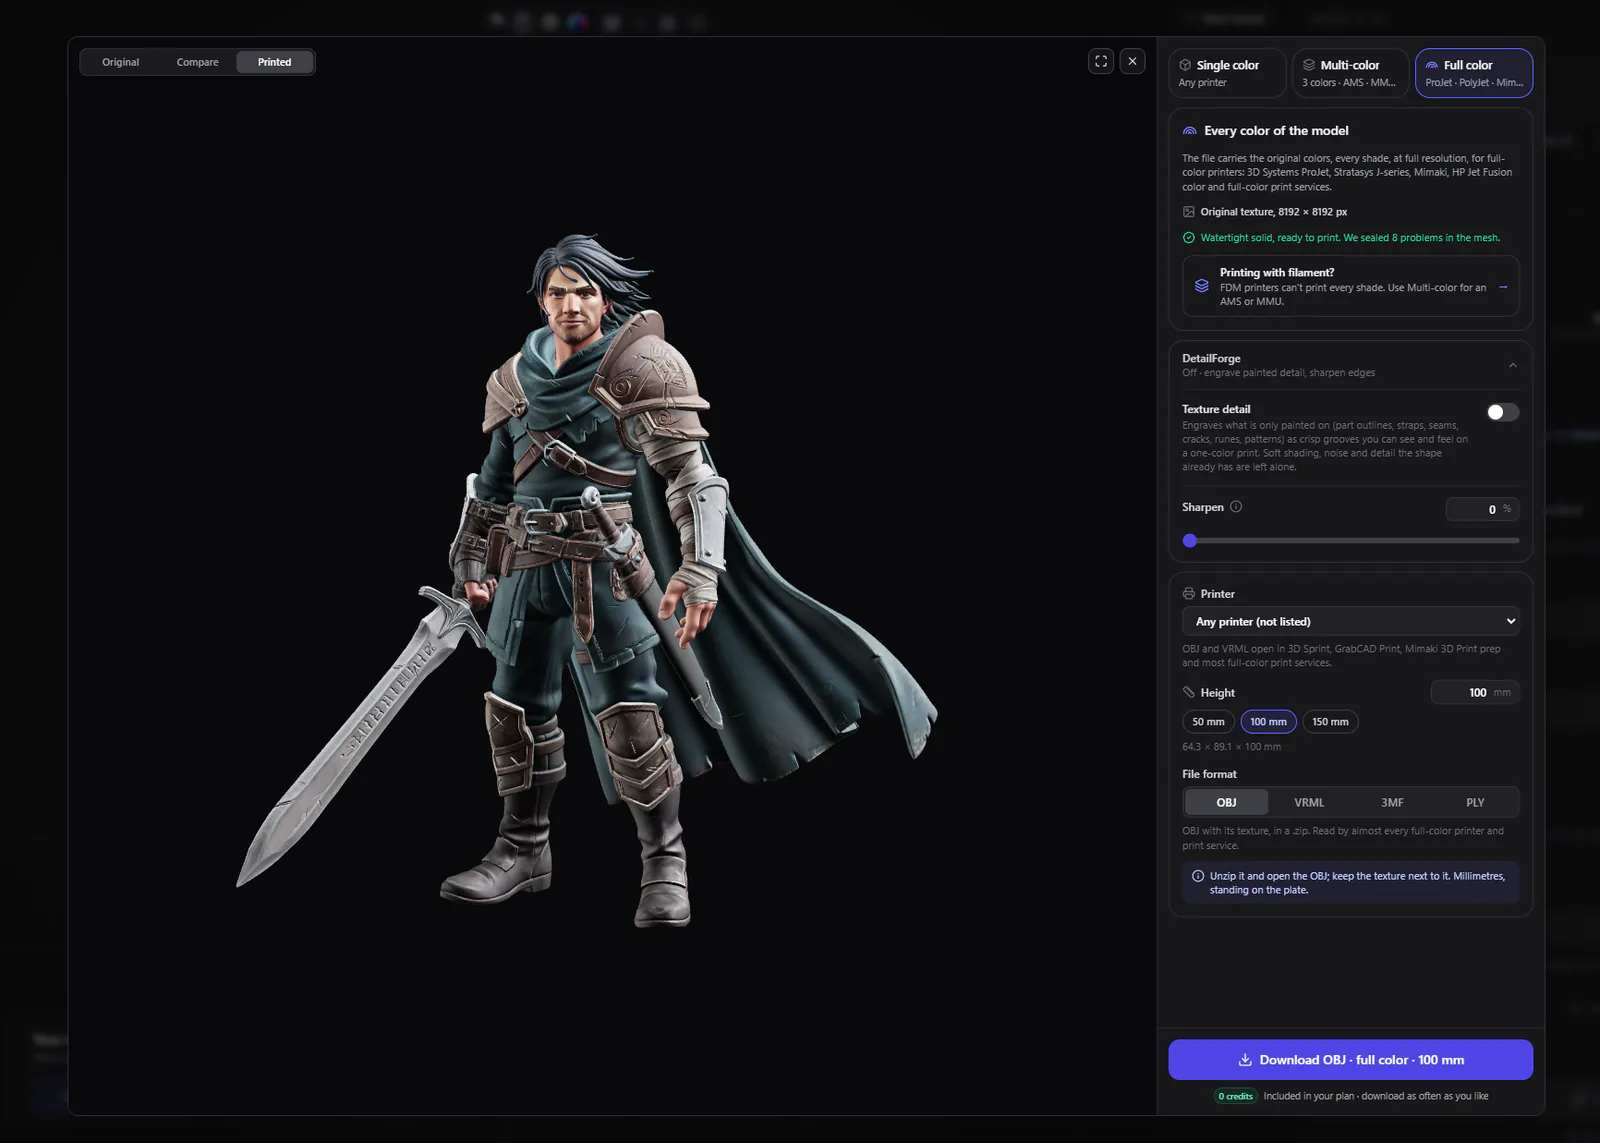
Choose Full color to keep every shade of the model instead of reducing it to a few filaments. The file carries the original colors at full texture resolution for full-color printers such as 3D Systems ProJet, Stratasys J-series (PolyJet), Mimaki and HP Jet Fusion color, and for full-color print services.
The printer list then shows full-color printers and their software, for example 3D Sprint for ProJet, GrabCAD Print for Stratasys and Mimaki 3D Print prep for Mimaki. Pick one, or keep Any printer (not listed) for a print service.
| Format | Contains | Best for |
|---|---|---|
| OBJ | Model and texture in a .zip | Almost every full-color printer and print service |
| VRML (.wrl) | Model and texture in a .zip | 3D Systems ProJet and ZPrinter |
| 3MF | One file with the texture inside | Stratasys GrabCAD Print, Mimaki and HP |
| PLY | One file with a color per vertex | Smaller files, but less sharp than a texture |
Unzip OBJ and VRML downloads and keep the texture next to the model file. Full color is only for printers that print color directly: filament (FDM) printers can't print every shade, so use Multi-color for an AMS or MMU instead.
How do I set the print size?
Enter the exact height in millimeters and choose your printer. The tool checks that the model fits the build plate, and the downloaded file arrives at that size in millimeters, standing on the plate.
The printer list covers popular models from Bambu Lab, Prusa, Creality, Anycubic, Elegoo and other brands. It also knows each printer's slicer and multi-color unit, for example Bambu Studio with an AMS, so the tips after download match your setup.
What is DetailForge?
DetailForge is an optional step that turns surface detail into real geometry. Texture detail engraves painted-on details like outlines, seams and patterns as grooves you can feel, even on a one-color print. Sharpen crisps the creases and edges already sculpted into the model.
| Setting | What it does |
|---|---|
| Texture detail | Engraves the painted lines. Fine (0.35 mm lines) suits resin and large prints, Medium (0.5 mm) suits most models, Bold (0.8 mm) suits small filament prints |
| Depth | How deep the lines go, from 0.1 to 1.5 mm |
| Raise the lines | Makes the lines stand out instead of cutting in |
| Sharpen | Deepens creases and crisps bevels, up to 300% |
Hold compare to see the model with and without DetailForge before you decide.
Which file format should I download?
Download 3MF for multi-color printing, because it is the only format that carries the filament colors to your slicer. Use STL for single-color printing in any slicer.
| Format | Multi-color | Single color |
|---|---|---|
| 3MF | Colors painted in, ready for Bambu Studio, OrcaSlicer and PrusaSlicer | Keeps the size and color, opens centered on your printer's plate |
| STL | Shape only | Works with every slicer |
| OBJ | Colors per vertex, for 3D apps and full-color print services | For 3D apps like Blender |
| GLB | With colors, for viewers, AR and the web | For games, AR and web viewers |
For full-color printers, the formats are OBJ, VRML, 3MF and PLY, as described above. 3MF files can also be previewed in your dashboard, including the colors of multi-color print files. For a deeper comparison, see 3MF vs STL.
Is Export for 3D Printing free?
Preparing the model and previewing the print are free for everyone. Downloading the print files is included in the paid plans, so you can check the result before deciding.
Related tools
- Add Base: add a pedestal or stand before printing
- Mesh Repair: fix a broken mesh with more control
- Smart Low Poly and Remesh: reduce the polygon count of heavy models
- Export Formats: every format compared
- Need a model to print? Generate one with Image to 3D or Text to 3D, or follow the step-by-step article on how to 3D print a picture
Frequently Asked Questions
Both need a model with colors of its own, such as textures or vertex colors. A model without any colors can only be exported in a single color. To print it in color, texture it first with the Texture Generator, then open Export for 3D Printing again.
No. Export for 3D Printing seals every model into a watertight solid and checks it edge by edge before you choose any settings, and it tells you how many problems it fixed. Use Mesh Repair only when you want to fix a model for other uses too.