Layers
How layers work in the Texture Painter: layer types, adding, renaming, reordering, grouping, merging and deleting layers, visibility, lock, opacity, blend modes, masks on AI layers, colour adjustments, and undo.
Everything you paint or generate in the Texture Painter is a layer. Layers keep changes separate, so you can hide, adjust, reorder or delete any of them without touching the rest. This page explains the layer types, every layer action, and how masks on AI layers work.
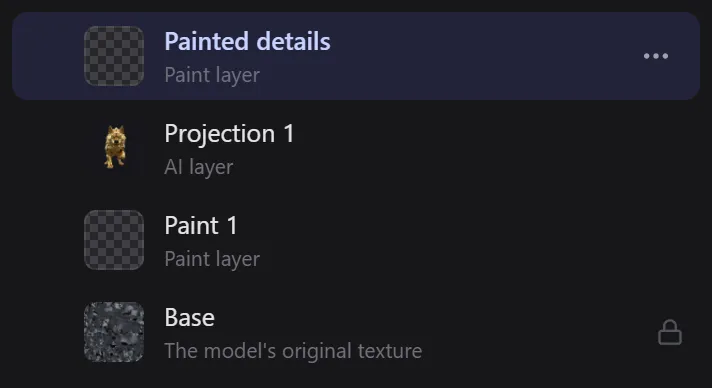
Layer types
| Type | Shown as | What it holds |
|---|---|---|
| Base | Base, "The model's original texture" | The texture the model came with. Always at the bottom and can't be painted. |
| Paint layer | Paint layer | Your brush, fill and image brush work |
| Solid colour | Solid colour layer | One colour over the whole model |
| AI layer | AI layer (or AI · 360°, AI · references, AI · upscaled) | An AI result, revealed with a mask you paint |
| Decal | Decal layer | One placed sticker, logo or label |
| Group | Group layer | Several layers kept together. Click the arrow to open or fold it. |
| Adjustment | Adjustment, indented above its layer | Colour changes (brightness, saturation, hue…) for the layer below it. See Adjust colors. |
Layers higher in the list cover the ones below them. New paint goes on the selected layer.
Add a layer
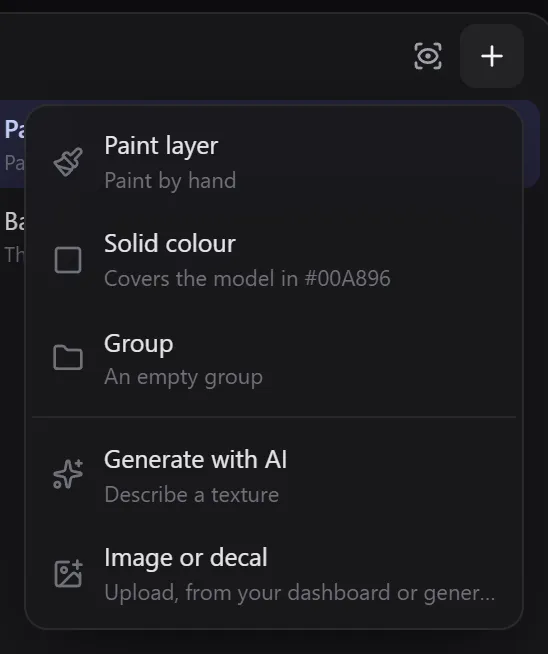
Click + (New layer) at the top of Layers:
| Item | What it adds |
|---|---|
| Paint layer | An empty layer to paint by hand |
| Solid colour | A layer that covers the model in your current colour |
| Group | An empty group, or a group with the selected layers in it |
| Generate with AI | Jumps to the prompt box to make an AI layer |
| Image or decal | Switches to the Decal tool: upload, pick from your dashboard or generate a sticker |
| Adjustment layer | Colour adjustments for the selected layer (see Adjust colors) |
Work with a layer
- Select: click the row.
Shift-click to select a range,Ctrl-click to add single layers. - Rename: double-click the name, type, and press
Enter. - Hide or show: click the eye at the left of the row (it appears when you hover). A hidden layer keeps its opacity for when you show it again.
- Reorder: drag the row up or down.
- Keyboard: with the list focused,
↑and↓select the layer above or below,Deletedeletes the selected layer, andCtrl+C,Ctrl+XandCtrl+Vcopy, cut and paste layers.
The layer menu
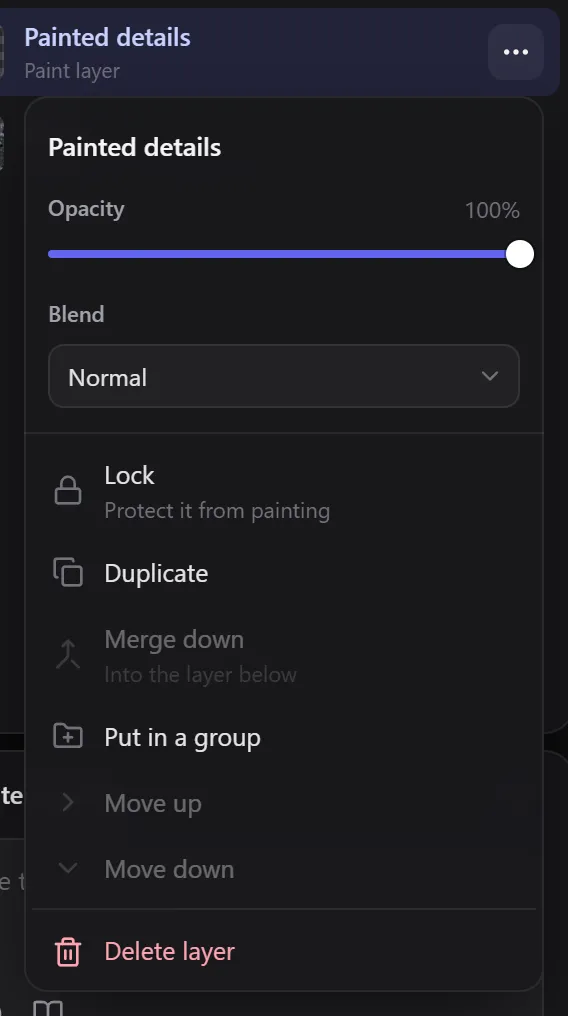
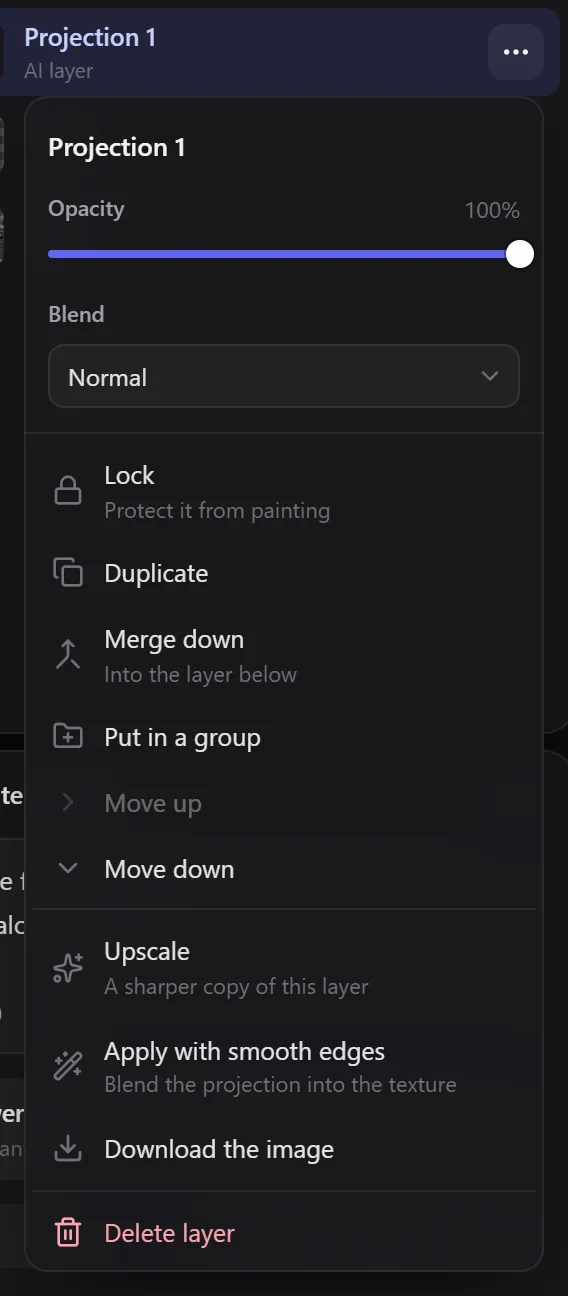
Click ⋯ on a row to open its menu:
| Item | What it does |
|---|---|
| Name field | Rename the layer |
| Opacity | How strongly the layer shows (0 to 100%). On an adjustment it's called Strength. |
| Blend | How it mixes with the layers below (see below) |
| Adjust colors… | Brightness, contrast, saturation, hue and more for this layer. With an adjustment already on it, opens that one; Add another adjustment stacks one more. |
| Lock / Unlock | Protect it from painting. A locked layer can't be painted or deleted. |
| Duplicate | A copy of the layer, with copies of its adjustments |
| Merge down | Merge it into the layer below. With several layers selected: Merge … selected. For a group: Flatten group. |
| Put in a group / Take out of the group | Group or ungroup it |
| Move up / Move down | Change its place in the list |
| Upscale (AI and decal layers) | A sharper copy of the layer. See AI painting. |
| Apply with smooth edges (AI layers) | Reveal the whole AI result with soft edges |
| Download the image (AI and decal layers) | Save the layer's source image |
| Delete layer | Remove it, together with its adjustments |
Blend modes
Normal, Multiply, Screen, Overlay, Darken, Lighten, Color dodge, Color burn, Hard light, Soft light, Difference and Exclusion. Multiply darkens (good for dirt and shadows), Screen lightens (good for glow and highlights), and Overlay adds contrast.
Masks on AI layers
An AI layer works differently from a paint layer: the AI result is fixed, and you paint where it shows. Think of it as a stencil.
- A new AI layer starts fully hidden.
- With the AI layer selected, the brush reveals the AI result and the eraser hides it again.
- Apply with smooth edges reveals everything the AI saw, with soft edges.
- Your brush colour isn't used on AI layers. To paint colour, add a paint layer (Paint colour in the options bar).
This is why you can generate freely: a weak result costs nothing to ignore, and a good one can be used only where it looks right.
Adjust a layer's colors
To change a layer's brightness, contrast, saturation, hue or colour temperature without repainting it, hover the row and click the sliders button (Adjust colors), or choose Adjust colors… in its ⋯ menu. The change is a separate Adjustment row directly above the layer, so you can tweak, hide or delete it any time. Masks work like on AI layers: with the adjustment selected, the eraser hides it and the brush brings it back. See Adjust a layer's colors.
Compare with the original
Press and hold the eye icon at the top of Layers (Hold to compare) to see the original model without any of your layers. Release it to bring them back.
Undo and redo
Undo and Redo are in the top bar, or use Ctrl+Z and Ctrl+Shift+Z (Ctrl+Y also redoes). One brush stroke is one undo step. Undo covers paint, layer changes and model rotations. On a touch screen, tap with two fingers to undo.
Related
- Painting tools
- AI painting
- Adjust a layer's colors
- The 2D view: check a single layer.
Frequently Asked Questions
The Base layer is the model's original texture and stays untouched, so you can always go back. Paint on a paint layer above it; the 3D view offers a Paint layer button.
Use Merge down in the layer menu, select several layers and choose Merge … selected, or press Ctrl+E with the layer list focused. For a group, choose Flatten group.
Layers higher in the list cover the ones below. Drag your paint layer above the AI layer.
AI painting
How to repaint a 3D model with AI in the Texture Painter: writing prompts, choosing a model and quality, what the AI sees, all-sides (360°) generation, reference images, revealing AI layers, upscaling and credits.
Adjust colors
Change the brightness, contrast, exposure, saturation, vibrance, hue, temperature or tint of any layer in the Texture Painter without changing its pixels: adjustment layers, compare, masks, Applies to and Apply.