Image to 3D
Image to 3D takes a regular photo or illustration and turns it into a fully textured 3D model - geometry, colors, and materials included. You upload an image, pick an AI model, and get a downloadable 3D asset in minutes (or seconds, depending on the model). It works with product photos, character art, concept sketches, or really anything visual.
Uploading Your Image
Getting started is simple. You have three ways to add your image:
- Drag and drop - Pull any PNG, JPG, or WebP file directly onto the upload area
- Browse - Click the upload area to open your file picker
- Paste - Copy an image to your clipboard and paste it straight in (Ctrl+V / Cmd+V)
The image appears as a preview thumbnail so you can confirm it looks right before generating.
Choosing the Right Model
With 12 single-image models available, picking the right one matters. Here are quick recommendations:
- Best overall - Prism 3.1 (default for a reason - great balance of speed, quality, and cost)
- Fastest results - Prism Turbo (under 90 seconds, good for rapid iteration)
- Best for games - Tripo P1 Game Ready (optimized topology, 60-90 seconds)
- Highest quality - Hunyuan 3.1 Pro (state of the art detail and textures)
- Best value - Trellis 2 (starts at just 15 credits)
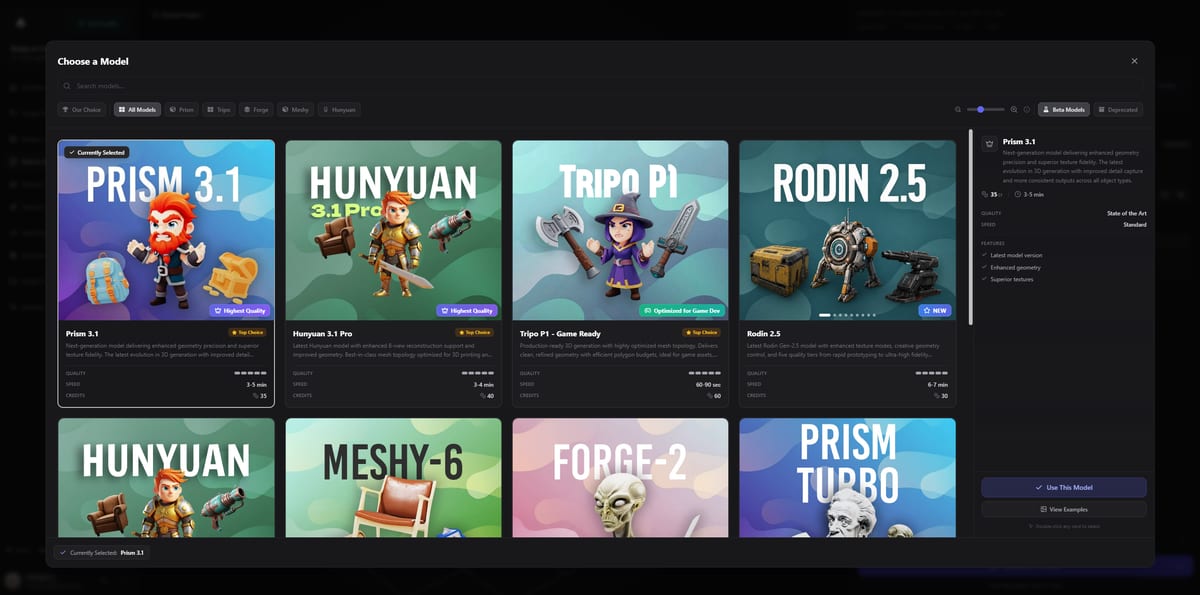
The model picker in Image to 3D, showing all available AI models with their credit costs and quality tiers.
Single-Image Models
All single-image models work from one photo. Upload your image, hit generate, and the AI figures out the full 3D shape from that single viewpoint.
| Model | Credits | Speed | Quality | Time |
|---|---|---|---|---|
| Prism 3.1 (default) | 35 | Standard | State of the Art | 3-5 min |
| Hunyuan 3.1 Pro | 40 | Standard | State of the Art | 3-4 min |
| Tripo P1 - Game Ready | 60 | Fast | State of the Art | 60-90 sec |
| Meshy 6 | 40 | Standard | Good | 5-10 min |
| Trellis 2 | 15-41 | Standard | High | 4-8 min |
| Rodin 2.5 | 30 | Fast-Standard | State of the Art | 6-7 min |
| Forge Gen-2 | 35 | Standard | State of the Art | 5-7 min |
| Hunyuan 3.0 | 40 | Standard | State of the Art | 3-4 min |
| Prism Turbo | 25 | Fastest | High | 50-90 sec |
| Prism 3.0 | 30 | Standard | State of the Art | 2-4 min |
| CSM | 35 | Standard | State of the Art | 4-6 min |
| Seed3D 1.0 | 30 | Standard | High | 8-12 min |
Seed3D 1.0 is currently in beta and available on paid plans only.
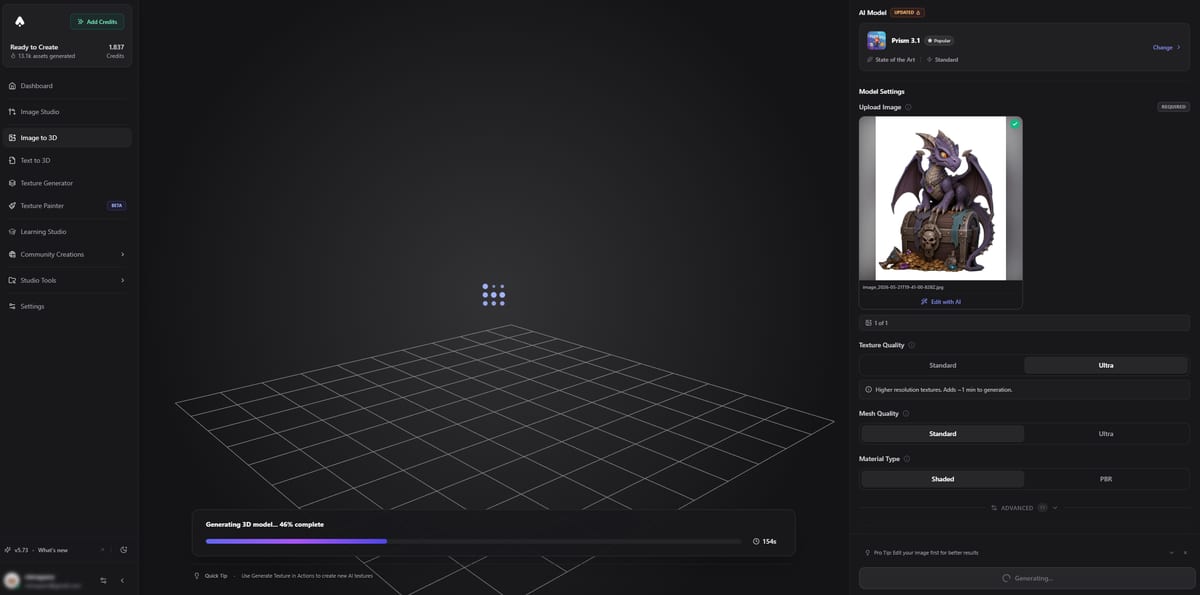
A model generation in progress, showing the real-time status indicator and estimated time remaining.
Multi-Image / Multi-View Models
When a single photo isn’t enough - say you have a product shot from multiple angles or a character turnaround sheet - multi-image models give you significantly more accurate results. They combine information from several viewpoints to reconstruct geometry that’s correct from every angle.
There are two input types depending on the model:
- Fixed views - The model expects specific angles (front, left, back, right). You assign each image to its slot.
- Flexible multi-image - Upload 1-8 images from any angles. The model figures out the spatial relationships.
Multi-image models are available on paid plans only.
| Model | Credits | Input Type | Time |
|---|---|---|---|
| Prism 3.1 Multi-view | 40 | 4 fixed views (front/left/back/right) | 3-5 min |
| Hunyuan 3.1 Pro Multi-view | 45 | 1-8 assigned views | 3-4 min |
| Tripo P1 Multi-view | 65 | 4 fixed views | 60-90 sec |
| Meshy 6 Multi-image | 45 | 1-4 images | 5-10 min |
| Rodin 2.5 Multi-image | 35 | 2-5 images | 6-7 min |
| Forge Gen-2 Multi-image | 40 | 2-5 images | 5-7 min |
| Hunyuan 3.0 Multi-view | 45 | 4 views | 3-4 min |
| Prism 3.0 Multi-view | 35 | 4 fixed views | 2-4 min |
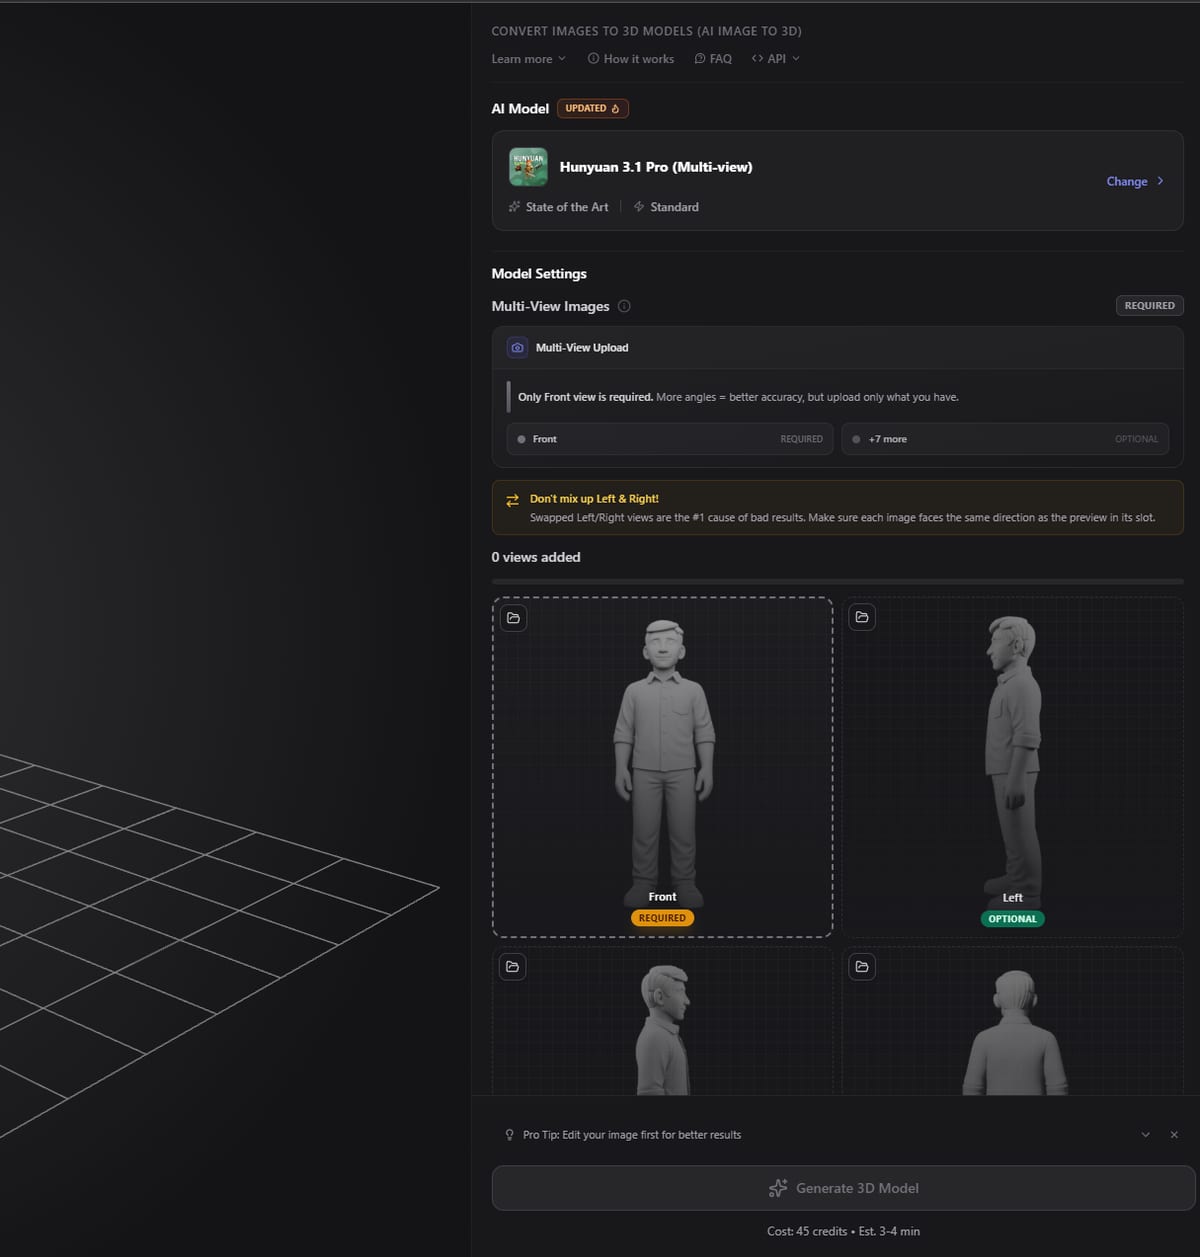
The multi-image upload interface, where you assign photos to specific viewpoints for more accurate 3D reconstruction.
Settings and Options
Depending on the model you pick, you’ll see different settings on the right panel. Here’s what the common ones do:
- Texture quality - Controls the resolution of the generated texture maps. Higher means sharper details but slightly longer processing.
- Mesh quality - Affects polygon density. Higher quality means smoother surfaces and better small details.
- PBR materials - When enabled, the model generates normal, roughness, and metallic maps alongside the base color texture. Essential for realistic rendering in game engines and 3D apps.
- Face limit - Sets the maximum polygon count. Lower values produce lighter meshes that load faster; higher values capture finer detail. Useful when targeting specific platforms.
- Seed - A number that makes generation reproducible. Same image + same seed + same settings = same result every time.
- Auto-size - Scales the output model to realistic physical dimensions based on what the AI thinks the object is.
Export Formats
Once your model is ready, you can download it in multiple formats directly from the 3D viewer:
- GLB - Universal format, works everywhere (Blender, Unity, Unreal, web viewers)
- FBX - Industry standard for game engines and animation pipelines
- OBJ - Simple and widely supported, good for static meshes
- STL - For 3D printing (geometry only, no textures)
- USDZ - Apple AR Quick Look format
All formats include textures where applicable. PBR maps export as separate image files when downloading OBJ or FBX.
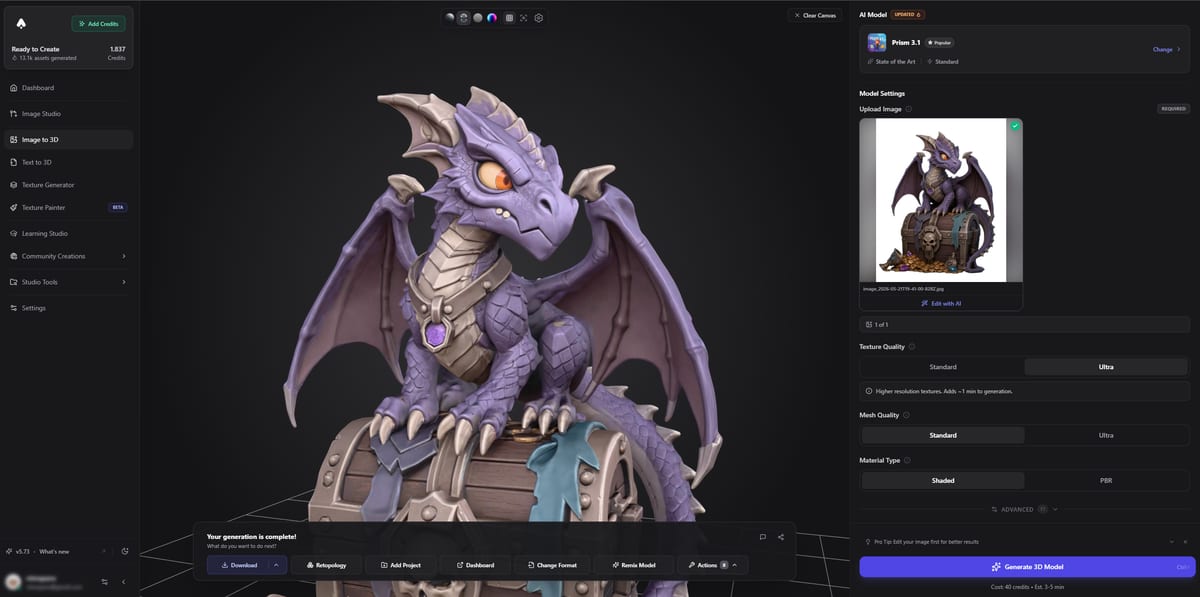
The built-in 3D viewer displaying a completed model, with format options for downloading.
Tips for Best Results
A few things that consistently improve output quality:
- Clean backgrounds - Solid or simple backgrounds help the AI focus on your subject. Busy scenes can create unwanted geometry around the edges.
- Good lighting - Even, well-lit photos give the AI more color and surface information to work with. Avoid harsh shadows or overexposed areas.
- Sharp images - Motion blur and compression artifacts reduce quality. Use the highest resolution source you have.
- Center your subject - The object should fill most of the frame without being cropped.
- Simple angles work best - For single-image mode, a slight 3/4 view (showing front and one side) gives the AI more depth cues than a perfectly flat front-on shot.
- Multi-image consistency - When using multi-view models, keep the same lighting, distance, and background across all your photos. Inconsistency confuses the reconstruction.
- Remove backgrounds first - If your photo has a cluttered background, consider removing it before uploading. The Image Studio has a one-click background removal tool that works great for this.
What’s Next
Ready to try it out? Open the Image to 3D generator and upload your first image — free credits on signup. If you’d rather start from a text description instead, check out the Text to 3D guide.
Last updated: May 2026
Frequently Asked Questions
What image format works best for AI 3D conversion?
PNG with a transparent or solid white background gives the cleanest results in 3D AI Studio. JPG and WebP also work fine, but avoid heavily compressed images since compression artifacts can show up as bumps or noise in the final 3D mesh. The higher the resolution, the better the textures will be.
Can I use photos taken with my phone for image to 3D?
Yes, phone photos work well as long as the subject is in focus and well-lit. In 3D AI Studio, models like Prism 3.1 handle phone photos with ease. Just make sure the object fills most of the frame and the background isn’t too cluttered. A simple trick is to photograph your object on a white table or sheet.
How accurate is AI 3D reconstruction from a single photo?
Single-image models in 3D AI Studio are surprisingly good at inferring the back and hidden sides of objects, but they’re making educated guesses. For objects with complex backsides (like a detailed sculpture), you’ll get better accuracy using multi-view models with 2-8 photos from different angles. Simple, symmetrical objects like bottles or cars reconstruct well from a single shot.
Does image to 3D preserve textures and colors?
Yes, all models in 3D AI Studio generate colored textures mapped onto the mesh. If you enable PBR materials, you also get normal maps, roughness maps, and metallic maps for realistic rendering in game engines. The texture quality depends on your input image resolution and the quality settings you choose.
How long does image to 3D generation take?
It depends on the model. Prism Turbo is the fastest at 50-90 seconds, while Meshy 6 can take 5-10 minutes. The default Prism 3.1 in 3D AI Studio typically finishes in 3-5 minutes. Higher quality settings and ultra texture options add some extra time.
Is there a free option for image to 3D?
3D AI Studio gives you free credits when you sign up, which is enough to test several generations. After that, models range from 15 credits (Trellis 2) to 65 credits (Tripo P1 Multi-view). There’s no free unlimited tier, but the free signup credits let you try it with no commitment.
Should I remove the background before uploading?
It’s not required, but it helps a lot. A cluttered background can confuse the AI into creating unwanted geometry around your subject. 3D AI Studio’s Image Studio has a one-click background removal tool you can use before converting to 3D. If your photo already has a clean, simple background, you can skip this step.
Can I use image to 3D models for 3D printing?
Absolutely. Export as STL from 3D AI Studio and import directly into your slicer (Cura, PrusaSlicer, etc.). For best printing results, choose a model with higher mesh quality settings and consider using the Quad Remesh tool to clean up the topology before printing. Solid, chunky objects print better than thin, delicate ones.
What’s the difference between single-image and multi-view models?
Single-image models take one photo and guess the full 3D shape, which works great for most objects. Multi-view models in 3D AI Studio accept 2-8 photos from different angles and combine them for much more accurate geometry. Use multi-view when precision matters, like product models or characters where the back needs to look exactly right.
Do I need a transparent background for 3D conversion?
A transparent background is ideal but not strictly required. What matters most in 3D AI Studio is that the background is simple and doesn’t distract from your subject. A solid white, gray, or transparent background all work well. Avoid photos with other objects, complex patterns, or gradients in the background.